Run a Headless Mopidy Spotify Server on Ubuntu 18.04
Background
I just spent way too long trying to set up a Mopidy audio server on my personal headless Linux machine, so I thought I might as well write down what I learned for posterity. But before we get into the nitty-gritty details, it’s worth explaining why I got myself into this mess in the first place.
My starting point was the following: We recently moved into our new place, and I wanted to set up an audio system that would allow me (or my wife) to listen to music from my Spotify account anywhere in the apartment. Also, because I’m lazy, I wanted to be able to control my music remotely, so that I wouldn’t have to get up to change songs or edit the volume. Of course, I could have just bought a pricy Sonos system, but I wanted to use the equipment I already had:
- An old analogue stereo with an AUX input.
- A headless Intel NUC machine running Kubuntu 18.04, connected to the stereo with an AUX cable.
- A Spotify Premium account.
The Final Product
TLDR: I ended up using the following setup:
- A Mopidy music server that runs on the Kubuntu machine.
- The Iris Mopidy extension, which allows controlling Mopidy through any web browser.
- The Mopidy Spotify extension, which allows playing music from Spotify on the Mopidy server.
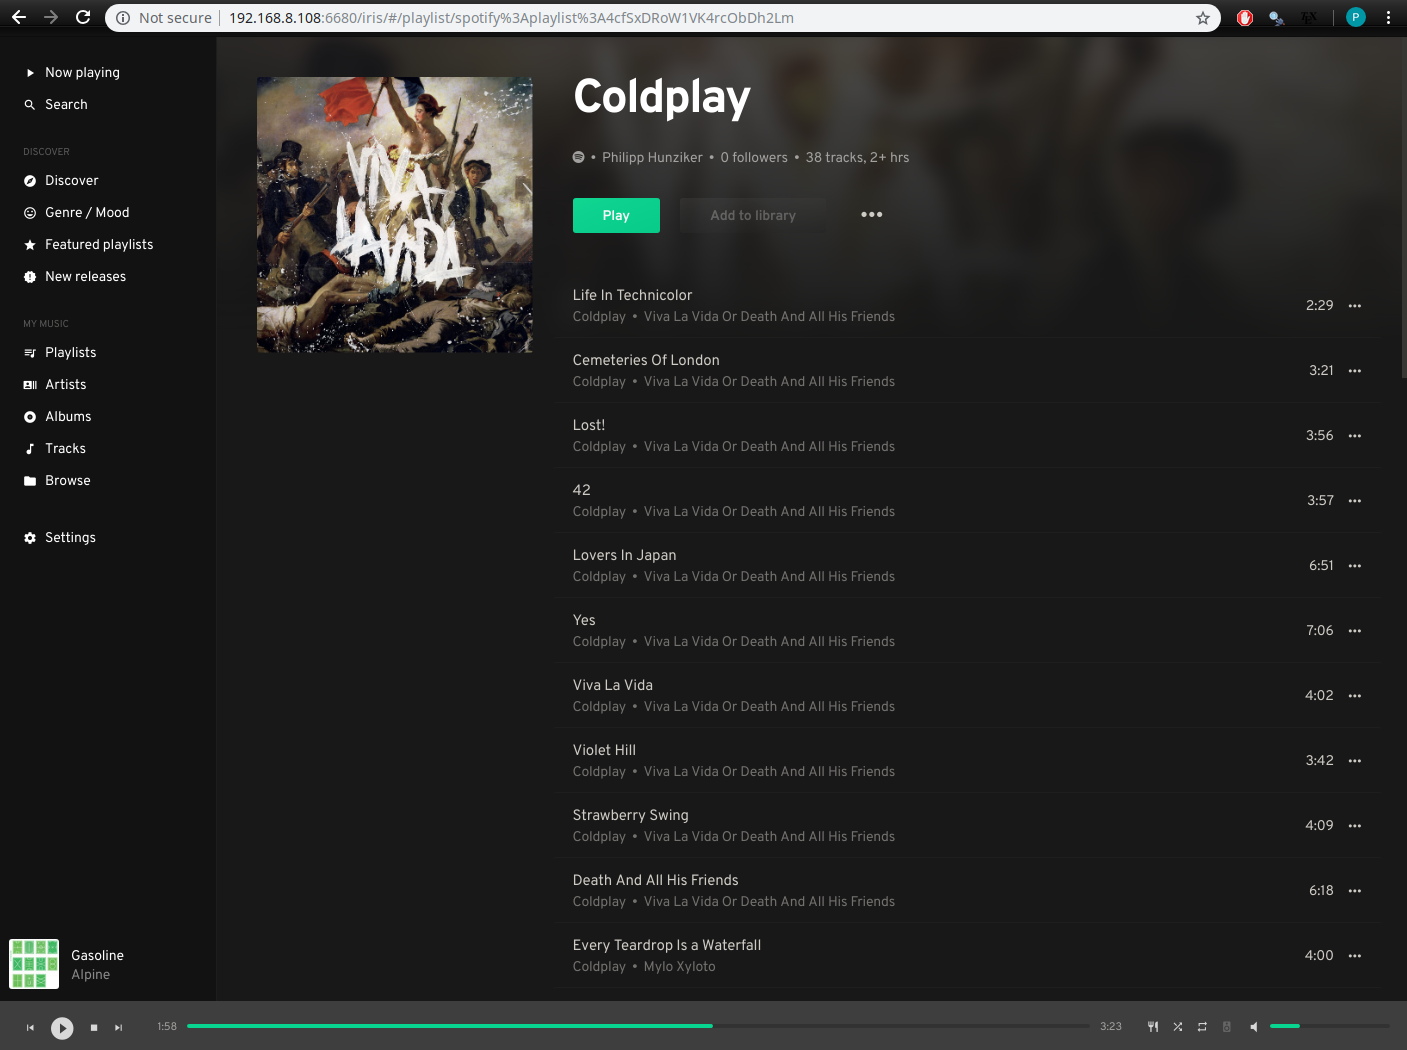
Figure 1: The Iris web interface for Mopidy. Pretty neat.
Step-by-Step Instructions
All of the following is to be run on the remote machine that will run the Mopidy server.
Step 1: Install Mopidy
On Debian/Ubuntu this is pretty straightforward (see also here):
wget -q -O - https://apt.mopidy.com/mopidy.gpg | sudo apt-key add -
sudo wget -q -O /etc/apt/sources.list.d/mopidy.list https://apt.mopidy.com/stretch.list
sudo apt-get update
sudo apt-get install mopidy
Step 2: Install Mopidy-Spotify
sudo apt-get install mopidy-spotifyStep 3: Configure Mopidy-Spotify
We’ll have to tell Mopidy our Spotify account details, and also authorize Mopidy-Spotify against our Spotify account (see here for details).
First, you’ll need a non-Facebook Spotify username and password. From the official installation instructions:
If you created your account through Facebook you’ll need to create a “device password” to be able to use Mopidy-Spotify. Go to
http://www.spotify.com/account/set-device-password/, login with your Facebook account, and follow the instructions. However, sometimes that process can fail for users with Facebook logins, in which case you can create an app-specific password on Facebook by going to facebook.com > Settings > Security > App passwords > Generate app passwords, and generate one to use with Mopidy-Spotify.
Second, go to https://www.mopidy.com/authenticate/#spotify and get your client_id and client_secret. Then, open your system-wide Mopidy configuration file located at /etc/mopidy/mopidy.conf and add the following text block:
[spotify]
username = your_user_name
password = your_password
client_id = ... client_id value you got from mopidy.com ...
client_secret = ... client_secret value you got from mopidy.com ...
We edit the system-wide Mopidy config file, instead of the user’s config file at ~/.config/mopidy/mopidy.conf, because later we want to run Mopidy as a service. The main benefit of running as a service is that Mopidy will start up automatically on boot, which is very convenient if it’s running on a headless server.
Step 4: Install Mopidy-Iris
Install pip if you don’t have it already (sudo apt-get install python-pip). Then
sudo pip install Mopidy-Irisand
sudo echo "mopidy ALL=NOPASSWD: /usr/local/lib/python2.7/dist-packages/mopidy_iris/system.sh" >> /etc/sudoersSee here for more details.
Step 5: Configure PulseAudio
As mentioned above, we will want to run Mopidy as a system-wide service, so that it will start automatically on boot. To do so, we will first set up PulseAudio to run in system mode, since Mopidy will use PulseAudio as a sound server. Note that in general, running PulseAudio in system mode is discouraged. For our use-case, however, running PulseAudio in system mode is necessary. Otherwise we will have to ssh into our machine and manually run pulseaudio --start after every reboot, which can be tedious.
In a frist step, we will have to create a systemd unit for PulseAudio. Create a text file at /etc/systemd/system/pulseaudio.service and add the following (see also here):
[Unit]
Description=PulseAudio Daemon

[Install]
WantedBy=multi-user.target

[Service]
Type=simple
PrivateTmp=true
ExecStart=/usr/bin/pulseaudio --system --realtime --disallow-exit --no-cpu-limit
Next, we will edit the PulseAudio configuration file so that it accepts sound over TCP from localhost. Simply add the following bit to /etc/pulse/system.pa:
load-module module-native-protocol-tcp auth-ip-acl=127.0.0.1We will also add the pulse user (which runs the PulseAudio daemon) to the audio group, which controls the sound devices:
sudo usermod -a -G audio pulseFinally, we’ll edit the system-wide mopidy configuration file so that it uses this PulseAudio server. Edit the output line in the [audio] block of /etc/mopidy/mopidy.conf as follows:
[audio]
output = pulsesink server=127.0.0.1
Step 6: Get Everything Up and Running
Enable and start the PulseAudio server:
sudo systemctl enable pulseaudio.service
sudo systemctl start pulseaudio.service
Enable and start the Mopidy server:
sudo systemctl enable mopidy
sudo systemctl start mopidy
You can check the status, restart, or stop PulseAudio/Mopidy with the following:
sudo systemctl status [service]
sudo systemctl restart [service]
sudo systemctl stop [service]
where [service] is pulseaudio-service or mopidy.
Step 7: Test
Go to http://192.168.X.XXX:6680/iris/, which should open the Iris web interface and allow you to play music from your Mopidy server, including all your Spotify content. Don’t forget to replace 192.168.X.XXX with the local address of your Linux machine, e.g. in my case 192.168.8.108.